Showing posts with label art techniques. Show all posts
Showing posts with label art techniques. Show all posts
Wednesday, May 4, 2011
Check this out
This is a link to a blog I just came across. Prompts each day. Good for the days when creativity lags. The blogger is having a book give away, so scoot over there and sign in for a chance to win.
Saturday, March 26, 2011
Saturday, March 5, 2011
Pansies in the spring

We are due another rain storm tonite so I picked pansies to press before they get beaten up by weather. Here they are in the little poetry book where they will be flattened out for future art work.
Wednesday, January 5, 2011
New artwork on blog
i posted a lot of new artwork - mail art on the altered book blog. So, if you want to see it you'll have to click on the link. http://bookartsandalteredbooks.blogspot.com/
Monday, November 8, 2010
Mail art


Here are some pics of some of the post cards I've made recently. I love mail art, specifically hand made post cards. I've been sending out at least a dozen a week, and have received a few very special ones in return.
Monday, September 27, 2010
New technique
Yesterday in Sacramento at the Mixed Media Group, Rosemary taught us to make fused fabrics with scraps of fabrics and bits and bobs of other materials, including papers. All with double sided fusible webbing. We had so much fun playing with the stuff she brought for us to work with and each of us made a sheet to use any way we want. Most people were making little purses, but I knew immediately that they would make wonderful mail art. Soon I"ll be posting pics of the post cards I'm making with my own fused fabrics.
Wednesday, June 2, 2010
Trevor's graduation book


Since Trevor discovered art this year, thanks to having a really good teacher who lit the spark - I thought he'd like an altered book for graduation. Here are a few spreads ( 4 of 24). Blue has always been his favorite color. In the back are two little matchbox drawers for $$$$$$$ - what he realllllly wants.
Starting a new project


I have this really interesting piece of junk (recycleable) box liner. I'm thinking about making a steampunk meets Alice in Wonderland collage + a little assemblage out of it. Here is a pic of the inside. The outside is just as interesting. Does it give you any ideas? Here are a couple of digital tweaks.
A cow?

Thought I'd better post a pic of Trevor painting his cow head mask. Here he is, happy with a paint brush in his hand. Hmmmm...... my gate needs painting soon. And it will be summer.....
Friday, May 7, 2010
Garden cuttings


In the middle of my table, I have a group of cuttings from my garden. I thought I'd take a pic and preserve the memory of them at this stage, and then - AHA! I decided to tweak it in Photoshop Elements as an exercise to help compose a painting. Here are three variations. The reason I like to play with them this way is - I would never have thought to go dark wtih this subject - yet when I tried it by adjusting colors and contrast and saturation - I can see that it would make a very interesting painting. Hmmmmm........ Look how the little face on the bottle disappeared, and a new face emerged! Awesome!
Thursday, May 6, 2010
Recycled tyvek mailing envelopes


This is a great way to use your old mail envelopes. They are sturdy and can hold up to heavy winds, and dance in the slightest breeze. 1. First, peel off any labels that you can get off, and tape as well. You can make these leaving them on, but it's easier to cut when they are removed. 2. Fold the envelope in half lengthwise. 3. fold each side into thirds, so you will end up with 6 sections. Make sharp folds, so it will be easy to cut good slits through them. 4. Leave about 1 and a half inches at the closed end of the envelope. Below that, using very sharp scissors cut across the fold, nearly all the way across - within about 3/4 of an inch. Cut another slit about 3/4 of an inch parallel with the first slit. (slits can be curved or straight) Continue cutting more slits to about 2 inches from the other end of envelope. 5. Turn the envelope over so the cuts are facing away from you and the clean uncut side is facing you. Now you will work your way down the envelope cutting slits in between the other slits, but from the opposite fold. Stop about 2 inches from end. See the pictures. 6. You can fringe the ends now, or cut shapes (I cut fish shapes) that will hang at the bottom. Or later you can staple or stitch on something to dangle from the end of the piece. 7. Now you carefully unfold the envelope with all the slits in it. 8. Then, when it is unfolded, grasp the folded end of envelope (or have someone else hold it) and stretch it from the opposite end. There it is. 9. Now cut across the ends of top section to make an opening to slip over a stick or pole.
Originally I made one of these out of a sheet of paper, which I found tore easily and so I looked for something that would fold and cut well but not tear easily. Tyvek was the perfect answer. It does not need to be an envelope. You can make them flat. I like the envelope as it makes it into a "sock". When I taught my friends to make the, they wanted to paint their old envelopes. I was hesitant, thinking it might stick together when the cuts were made, but only one friend had a problem, and it was because the paint was thicker. Nancy used the Lumiere paint and it was perfect. Next time she wants to paint the inside and the outside. I just received a package yesterday in the mail and have another envelope to recycle. Maybe I'll paint this one.
You can vary the lengths and widths and numbers of slits. The length of the stretched envelope will vary depending on the slits you cut. I hope you have fun with these. Let me know what you do, please.
Tuesday, May 4, 2010
A day in May
 Here are a few pics. First is a volunteer oak tree - when I pulled it out, the entire root came out with it. Very sturdy root system. Sometime when I pull them out I get the old acorn as well. The iris photos was taken today in Modesto at Bev's house. It's the most beautiful color I've seen. I did not tweak the color or lighting digitally. This is just they way it looks.
The next photo is a windsock made of a recycled tyvek mail envelope. I learned to make the cuts in a book "A Japanese Touch for the Seasons". After some experimenting, I adapted the cutting pattern for a recycled mailing envelope. Tyvek cuts easily, is super strong and lightweight, and takes to paints. Nancy used Lumiere paints on this one. These are so much fun I had to teach my art pals to make them.


Monday, April 12, 2010
New works
 These are new works. The bird one was started at the Senior Center and finished off at home. The Man of Sorrow was done awhile back, and I was never satisfied with it, so I dug it out yesterday, added the turquise color, punched up the reds, and added the little bird. Then I scratched in the word Sorrow on the darkest man. What does it all mean? I leave that to the beholder. A clue, however is that there is a poem there that reads in part:
"He touched her hand and the fever left her. We need His touch on our fevered hands! The cool, still touch of the Man of Sorrows, who knows us and loves us and understands." I don't remember the author, I tore it out of a book of quotations.


Thursday, April 1, 2010
CitraSolv revisited
I put up a new post on the other blog about what i did with some of the backgrounds I made yesterday. Here is the link.
Wednesday, March 31, 2010
Art Playtime


Diane of the Sac Mixed Media group brought in samples of papers she created using National Geographic magazines and CitraSolv concentrate, a cleaning agent sold at some health food stores.
What it does is saturates the inks and takes them back to a liquid, so when the pages are pressed together the inks run and smear and bubble up and do fantastic things. The CitraSolv web site has an artist section with directions how to do this. My one addition is - if you use the product, puncture only a tiny pinhole or two in the foil cap because it comes out faster than you expect. Here are only a few pictures of some papers I can now use in collages that I made with this method. Pardon the dark shadows - I was on my deck. This is a technique that needs to be done outside. The fumes are a bit on the strong side, and it's drippy and messy. If you have not tried it and like seredipitous experimentation - you gotta give it a go. Thanks Diane for showing us your samples, it's just what I needed to get me enthused. I'd seen pics online before but they don't show well. You have to see it in person.
Saturday, March 6, 2010
Another monoprint


I experimented with monoprinting again, this time using fluid matte medium instead of water. I also used deli wrap instead of the acrylic sheet. I had done some painting onto deli wrap a couple years ago and making a fast transfer onto paintings, and this is much like that - except using the fluid matte medium and the water soluble crayons - it is much easier to control what transfers. I'l be doing a lot more with this now. Here's some new pics.
Thursday, March 4, 2010
Another monoprint

When I lifted this one, the outlines didn't print, so they have been touched up with a black crayon.
Wednesday, March 3, 2010
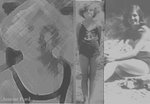
Monoprinting


I have been reading Mixed Media Self Portraits by Cate Coulacos Prato. One of the techniques used was to place a photo of yourself under an acrylic sheet, then using water soluble oil pastels or watercolor crayons to trace and color in the image. Then to take a dampened sheet of watercolor paper and place it down on the colored image, and press well with hands. When it is pulled up, the color will have transferred over to the wc paper. I recently purchased a couple different brands of watercolor crayons to test the colors, so I was excited to have a good project to use them on. I decided to use book pages to print on rather than the watercolor paper, as images transfer to them just as well, and it's a "greener" way to do things.
Here are three that I did, with the original as pulled and then with the contrast and darkness digitally enhanced. It's quite obvious I'm a beginner at this.
Saturday, February 13, 2010
A new piece finished

This little dress is a wooden one that I produced maybe 20 years ago. I found it in a closet and collaged the back of it. It certainly freshened it up. Instead of being "country" now it's shabby chic.
Friday, February 5, 2010
A new background

I had a bunch of scraps lying around and am now ready to paint over them. They are glued to watercolor paper. I'm going to use fluid gesso. Later I'll think what to do next.
Other new works are on the other blog so pop over there if you want to see.
Subscribe to:
Posts (Atom)